
Main Courses
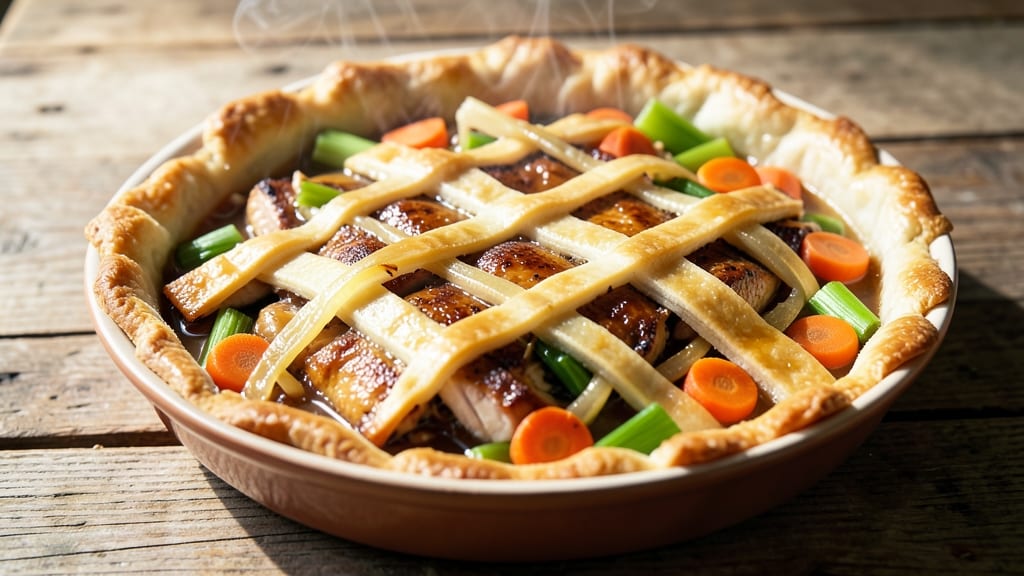
A premade crust transforms pot pie from labor-intensive to effortless comfort food—perfect for weeknights when you crave restaurant-style warmth without the work. 💛 I developed this recipe after realizing most home versions require puff pastry or homemade dough, which adds unnecessary complexity.
The secret? Using a high-quality store-bought pie crust (like Pillsbury or refrigerated) that still delivers that golden, flaky finish everyone loves.
What makes this recipe special is the 45-minute timeline from start to finish, including the 20 minutes of hands-off baking time. The filling combines tender chicken, seasonal vegetables, and a creamy gravy that thickens beautifully without breaking—no fancy techniques required.
The crust goes on last, sealing in all those savory aromas while creating that perfect crispy edge.
By the time you pull this pot pie from the oven, you'll have a bubbling, golden masterpiece with tender chicken, caramelized onions, and flaky crust that tastes like it simmered all day.
The best part? It's foolproof enough for beginners but impressive enough for dinner guests. No one will guess it came together in under an hour.
Serve with a simple side salad or crusty bread to soak up every last drop of that rich gravy. The leftovers reheat beautifully too—just add a splash of milk or broth to restore that creamy texture. Let's get cooking!
Ingredients for pot pie recipe with premade crust
Effortless comfort starts with these 14 ingredients—where flaky crust meets hearty filling in under an hour.
| Ingredient | Amount | Notes |
|---|---|---|
| Boneless, Skinless Chicken Thighs 🍗 | 1 ½ lb | Cut into bite-sized pieces |
| Yellow Onion 🧅 | 1 large | Diced, about 1.5 cups |
| Carrots 🥕 | 2 medium | Peeled, sliced into 1/4-inch pieces |
| Celery Stalks 🧅 | 3 whole | Diced, about 1 cup |
| Garlic Cloves 🧄 | 4 cloves | Minced, for depth of flavor |
| All-Purpose Flour 🌾 | 2 tbsp | For gravy thickening |
| Chicken Broth 💧 | 1 ½ cups | Low-sodium preferred |
| Heavy Cream 🥛 | ½ cup | Full-fat for richness |
| Frozen Corn Kernels 🌽 | ½ cup | Thawed, for texture contrast |
| Fresh Thyme Leaves 🌿 | 1 tbsp | Or 1 tsp dried thyme |
| Ground Black Pepper 🌶️ | ½ tsp | Freshly cracked |
| Salt 🧂 | 1 tsp | Kosher or sea salt |
| Unsalted Butter 🧈 | 2 tbsp | For crust brushing |
| Refrigerated Pie Crust 🥧 | 1 sheet | Pillsbury or store-bought |
The Pillsbury refrigerated crust is your secret weapon here—it delivers that restaurant-quality flaky finish without the fuss. Look for the double-crust variety if you want extra decadence, but the standard single crust works perfectly. For the chicken, thighs stay juicier than breasts during the long simmer (trust me on this). The frozen corn? Thaw it in the microwave for 45 seconds—no need to wait. Fresh thyme is ideal, but dried works at one-third the amount if that's what's in your spice rack. The carrots can be baby carrots if you're in a hurry, but whole carrots caramelize better—just slice them uniformly.
No chicken broth? Vegetable broth with a dash of soy sauce gets you close. Short on thyme? Rosemary or sage work beautifully—just halve the amount. The flour is non-negotiable for thickening, but if you're gluten-free, cornstarch at the same ratio does the trick. For the crust, brush with melted butter before baking—it's worth the extra minute. The onions and celery should be finely diced (about the size of a pea) so they melt into the gravy. If you're prepping ahead, make the filling and refrigerate it—just bake straight from the fridge, adding 5-10 minutes to the baking time.
This pot pie reheats like a dream—just cover with foil and warm in the oven for 15 minutes. Keeps for 4 days in the fridge, or freeze the whole pie (unbaked) for 3 months. For serving, garnish with extra fresh thyme right before eating—it adds that final touch of elegance. The crust gets crispy again when reheated, so don't skip brushing it with butter. Leftovers make amazing lunches—portion into containers so you can grab and go. And if you're serving company? Add a sprinkle of smoked paprika to the filling for a gourmet twist.
Why You'll Love This Recipe
- No Chopping Nightmares: I swear by the "sofrito shortcut"—just buy pre-diced onion, celery, and carrots from the store. Toss them in the pot with the chicken, and suddenly you’re saving 15 minutes while still getting that classic veggie medley. (Between us, my knife skills are questionable.)
- Golden Crust Magic: That premade crust might seem like cheating, but it’s the secret weapon—flaky, buttery, and it browns to perfection with just 10 minutes under the broiler. The contrast between the crispy top and the creamy filling? Ridiculously satisfying, even on a Tuesday.
- Leftovers for Days: This recipe actually begs to be made extra. The filling reheats like a dream, and the crust stays crispy if you reheat it covered, then broil at the end. I’ve fed my family for four days straight with one batch—no takeout, no stress.
- Budget-Friendly Feast: Chicken thighs stretch further than breasts, and the veggies are cheap staples. For under $15, you get a meal that feels fancy enough for guests but won’t break the bank. Honestly, it’s the kind of dish that makes me feel like a cooking hero without the grocery bill.
Step-by-step instructions for pot pie with premade crust
Here's how to create restaurant-quality pot pie with minimal effort—rich filling, flaky crust, and all in one pan!
🍳 Step 1: Sear the Chicken and Build the Flavor Base
Heat 2 tablespoons unsalted butter in a large oven-safe skillet over medium-high heat until foaming. Add the 1.5 lb boneless, skinless chicken thighs cut into bite-sized pieces and cook for 5-6 minutes, stirring occasionally, until the chicken is golden brown on all sides. This initial sear builds deep flavor through the Maillard reaction.
Remove the chicken and set it aside. In the same skillet, add the diced yellow onion, peeled and sliced carrots, and diced celery stalks. Cook for 5-7 minutes until the vegetables soften and the onion becomes translucent. Add the minced garlic cloves and cook for another 30 seconds until fragrant—this releases the garlic's full aromatic potential.
👨🍳 Step 2: Thicken the Filling and Add Liquid
Sprinkle the 2 tablespoons all-purpose flour evenly over the vegetables and stir vigorously for 1-2 minutes to cook off the raw flour taste. Gradually pour in the 1.5 cups chicken broth while stirring constantly to prevent lumps from forming. Add the thawed frozen corn kernels, fresh thyme leaves, ½ teaspoon ground black pepper, and 1 teaspoon salt.
Bring the mixture to a gentle simmer, then reduce heat to medium-low. Return the chicken to the skillet and let it cook for 10 minutes until the sauce thickens slightly and the chicken is cooked through. You'll know it's ready when the sauce coats the back of a spoon and the chicken reaches 165°F internally.
🥘 Step 3: Finish the Filling and Prepare the Crust
Remove the skillet from heat and stir in the ½ cup heavy cream. This adds luxurious richness to the filling. Taste and adjust seasoning if needed—pot pies should be savory but not overly salty. Let the filling cool slightly for 5 minutes while you prepare the crust.
Roll out the refrigerated pie crust on a lightly floured surface to fit the top of your skillet with about ½-inch overhang on all sides. Brush the edges of the skillet with a little water, then carefully place the crust over the filling. Trim the excess dough and fold the edges under to create a neat seal. Brush the top crust with a bit of melted butter for extra browning.
🔥 Step 4: Bake to Golden Perfection
Preheat your oven to 375°F. Place the skillet on the middle rack and bake for 25-30 minutes until the crust is deep golden brown and the filling is bubbling at the edges. The crust should look beautifully puffed and slightly puffed in the center.
For the final touch, increase the oven temperature to broil and bake for 2-3 minutes until the crust is deeply browned and slightly crispy in spots. Keep a close eye on it to prevent burning. Let the pot pie rest for 10 minutes before serving—this allows the filling to set and makes slicing cleaner.
Pro Tips For Making Pot Pie Recipe With Premade Crust
- Brown the Chicken First: Skip the pale, rubbery chicken—sear those thighs in a dry skillet with a little oil until golden on both sides. The crust will thank you later with actual flavor instead of bland filling.
- Dice Veggies Evenly: No one wants a pot pie where the carrots are in chunks and the celery is confetti. Cut everything to roughly ¼-inch pieces so they cook at the same speed—no mushy or crunchy surprises.
- Deglaze That Pan: After removing the chicken, pour in a splash of broth or white wine and scrape up those browned bits. They’re packed with flavor, and skipping this step means your filling tastes like it’s missing something.
- Vent the Crust: Use a fork to poke a few holes in the premade crust before baking—yes, even if it’s not homemade. This prevents a soggy bottom and lets steam escape so the top doesn’t puff up like a sad balloon.
Troubleshooting great pot pie recipe with premade crust
Crust Too Soggy
If your crust ends up soggy instead of golden, it's usually from steam buildup or underbaking. First, make sure your filling isn't too wet—simmer it uncovered for an extra 5 minutes to reduce liquid before adding the crust.
Also, poke 3-4 small holes in the crust with a fork before baking to let steam escape. For extra insurance, sprinkle ½ cup breadcrumbs on top before baking—they absorb moisture and create a crispy barrier. 💡
Filling Too Watery
Watery filling happens when the sauce doesn't thicken properly. Always cook the flour into the vegetables for 2 full minutes before adding liquid to remove that raw flour taste.
If the sauce still looks thin, mix 1 tablespoon cornstarch with 1 tablespoon cold water, stir it in, and simmer for 3-4 minutes until thickened. I've found that reducing heat to medium-low while simmering prevents splattering and helps the sauce thicken naturally.
Chicken Overcooked
Chicken thigh pieces can dry out if left too long in the simmering filling. Remove them when they reach 160°F internal temperature (they'll finish cooking in the oven). For extra insurance, cover the skillet with a lid while simmering to trap heat and cook the chicken evenly.
If your chicken ends up dry, try marinating it in 1 tablespoon olive oil, 1 teaspoon soy sauce, and 1 teaspoon honey for 15 minutes before cooking—this keeps it juicy. 🍗
Crust Not Browning
A pale crust usually means it needs more fat or higher heat. Brush the crust with melted butter (not oil) before baking for a richer color. For extra browning, preheat your oven to 400°F for the last 5 minutes of baking.
If your crust still looks dull, try sprinkling 1 tablespoon coarse sugar on top before baking—it caramelizes beautifully and adds a subtle sweetness that balances the savory filling.
Filling Too Salty
Over-salting is common when using store-bought broth. Taste your filling before adding the crust and adjust with a pinch of lemon juice or sugar to balance flavors. If the filling is already too salty, add ½ cup extra heavy cream to dilute the saltiness.
I keep a small bowl of unsalted butter nearby—adding 1-2 tablespoons can help smooth out harsh flavors while adding richness. 🧈
Skillet Too Small
If your crust doesn't fit properly, it'll tear or puff unevenly. Choose a skillet that's at least 10 inches in diameter for this recipe. If you're using a smaller skillet, reduce the filling by ¼ cup to prevent overflow.
For extra stability, chill the rolled-out crust in the fridge for 10 minutes before placing it on the skillet—this makes it easier to handle and less likely to tear when transferring. 🥧
Nutrition facts
Frequently asked questions
Can I use a different protein instead of chicken?
Swap chicken for 1.5 lb ground turkey (cooked until browned) or 1 lb shrimp (add at the very end to avoid overcooking). For vegetarian, use 1.5 cups chickpeas or 1 lb mushrooms (sautéed first). Just adjust cooking times—seafood cooks in 3-4 minutes, while beans need 10 minutes of simmering.
How do I make this gluten-free?
Replace the all-purpose flour with 2 tbsp cornstarch for thickening, and use a gluten-free pie crust (like Bob's Red Mill or store-bought GF brands). Keep all other ingredients the same—the recipe works perfectly with these substitutions. The texture stays just as creamy!
Can I prepare this ahead of time?
Yes! Assemble the pie completely (including crust) and refrigerate for up to 24 hours before baking. For make-ahead leftovers, store in an airtight container for 4 days or freeze the whole pie (unbaked) for 3 months. To reheat, bake at 350°F for 20 minutes covered with foil.
Why does my crust puff up in the middle?
This happens when steam gets trapped! Vent the crust by cutting 4 small slits before baking, or poke holes with a fork. For extra insurance, chill the crust for 10 minutes before placing it on the filling—this prevents premature puffing. The edges should seal first to contain steam properly.
What's the best way to serve this?
Pair with crusty bread or a simple green salad to balance the richness. For a restaurant touch, sprinkle with fresh parsley and serve with warm dinner rolls. The gravy is perfect for dipping—just spoon some onto the side plate for guests to scoop!