
Desserts
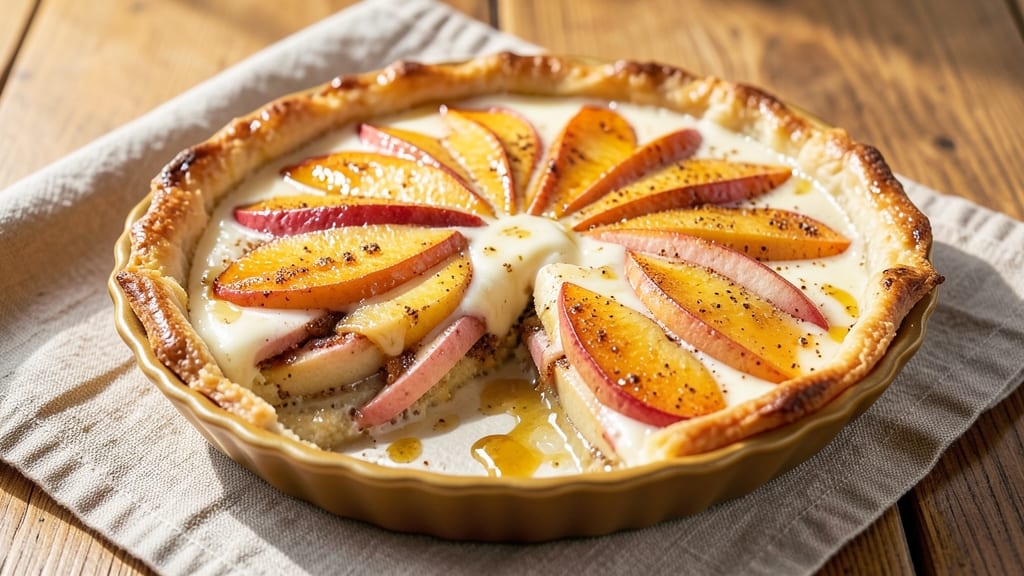
This apple mango pie recipe transforms summer's sweetest fruits into a dessert that tastes like sunshine in every bite. 🌞 The secret lies in balancing tart apples with tropical mango, creating a filling that's both familiar and exciting.
A buttery shortbread crust provides the perfect foundation, while a simple glaze adds the finishing touch that makes this pie irresistible.
What makes this recipe special is its approachability—no fancy techniques required. You'll work with simple ingredients like diced apples, ripe mango, and warm spices that come together in a single pie dish.
The baking process is straightforward, ensuring a golden crust and tender filling that's just set in the center. It's the kind of dessert that feels indulgent but comes together with ease.
By the time you're done, you'll have a pie with layers of flavor: the crispy, buttery crust, the tender fruit filling that's sweet yet balanced, and the glossy glaze that ties everything together.
The aroma alone will have everyone gathering around your table. This is the perfect dessert for summer gatherings, potlucks, or whenever you want to bring a taste of the tropics to your kitchen.
Whether you're a seasoned baker or just starting out, this apple mango pie delivers restaurant-quality results with minimal effort. The recipe is adaptable too—swap in other tropical fruits if needed, or adjust the sweetness to your taste. Let's get started on creating something truly special.
Ingredients for apple mango pie
Buttery crust meets tropical fruit magic in this summer dessert showstopper.
| Ingredient | Amount | Notes |
|---|---|---|
| All-Purpose Flour 🌾 | 2 ½ cups | Sifted for light crust |
| Unsalted Butter 🧈 | 1 cup | Cold, cubed for crust |
| Granulated Sugar 🍚 | ½ cup | Plus 1 tbsp for filling |
| Light Brown Sugar 🍚 | ¼ cup | Packed for crust texture |
| Large Eggs 🥚 | 1 whole | Cold, for binding |
| Vanilla Extract 🍯 | 1 tsp | Pure vanilla preferred |
| Ground Cinnamon 🌿 | 1 tsp | Freshly ground preferred |
| Salt 🧂 | ½ tsp | Fine sea salt preferred |
| Apples 🍎 | 3 medium | Honeycrisp or Granny Smith |
| Ripe Mangoes 🥭 | 2 large | Ataulfo or Tommy Atkins |
| Lemon Juice 🍋 | 2 tbsp | Freshly squeezed |
| Cornstarch 🌾 | 1 tbsp | For thickening filling |
| Powdered Sugar 🍚 | ½ cup | For glaze |
| Heavy Cream 🥛 | 2 tbsp | For glaze |
The crust is where it all begins. Cold butter is key—don't let it soften, or you'll end up with a tough crust instead of that perfect flaky texture. King Arthur or Bob's Red Mill flour works best if you're picky about your baking staples, but any all-purpose will do. For the apples and mangoes, local farmers markets often have the ripest fruit—look for mangoes that give slightly when gently squeezed and apples that are firm but not rock-hard. The filling needs about 3 cups of diced fruit total, so adjust based on your fruit's natural juiciness. If your mangoes are extra juicy, add an extra tablespoon of cornstarch to thicken the filling.
No honeycrisp apples? Granny Smith or Fuji work just as well—they hold up better to baking. Mangoes too firm? Leave them out overnight at room temperature to ripen. The lemon juice is non-negotiable—it brightens both the fruit and the crust. For the glaze, if you're feeling fancy, swap the heavy cream for coconut cream to keep it dairy-free. And if you're short on powdered sugar, blend granulated sugar in a food processor for a quick substitute. The spices? Ground cinnamon is best, but cassia cinnamon works too—just know it has a slightly stronger flavor.
This pie tastes even better the next day, so bake it a day ahead if you can. Store it in an airtight container at room temperature for 2 days, or refrigerate for 4-5 days. For freezing, slice the pie first and freeze the portions on a tray before transferring to a bag—this prevents sogginess. The crust stays crispy for days if kept dry, while the filling's texture improves with time. When reheating, cover with foil for 2 minutes to prevent the glaze from melting too fast.
Why You'll Love This Recipe
- No-Fuss Crust: The butter-and-flour crust is ridiculously forgiving—no chilling required, no rolling stress. I’ve burned it twice (yes, really), and it still held together like a champ. Just mix, press, bake.
- Tropical Sweet Spot: That caramelized sugar crust? Chef’s kiss. The brown sugar adds this deep, buttery richness while the granulated keeps it bright—like a hug from a fruit bowl and a bakery in one bite.
- Weekend or Weeknight: Slice it warm for brunch, pack it for lunch—it’s my go-to for potlucks or when I’m too tired to cook. Honestly, I’ve even eaten cold slices straight from the fridge. (Don’t tell my dietitian.)
Step-by-step instructions for tropical apple mango pie
Here's how to assemble this vibrant pie with a perfect balance of crisp crust and luscious tropical filling.
👨🍳 Step 1: Prepare the Buttery Crust
In a large bowl, combine the 2.5 cups all-purpose flour, 0.5 tsp salt, and 1 tsp ground cinnamon. Cut in the 1 cup cold cubed unsalted butter using a pastry cutter or your fingers until the mixture resembles coarse crumbs with pea-sized butter pieces. This texture is crucial—it ensures a flaky crust rather than a tough one.
Add the 0.5 cup granulated sugar and 0.25 cup packed light brown sugar to the flour mixture. Stir lightly with a fork until evenly distributed. Then add the 1 whole cold egg and mix just until the dough comes together. Avoid overworking—you want to keep the butter cold for maximum flakiness.
Turn the dough onto a lightly floured surface and gently pat it into a 12-inch circle. Wrap it in plastic wrap and refrigerate for at least 30 minutes while you prepare the filling. This resting time relaxes the gluten and makes rolling easier. I like to press the dough between two sheets of parchment paper when rolling to prevent sticking.
🍳 Step 2: Make the Tropical Fruit Filling
Peel and dice the 3 medium apples into ¼-inch pieces. Peel the 2 large ripe mangoes and cut them into similar-sized chunks. The fruit should be consistent in size so it cooks evenly. Place both fruits in a large bowl and toss with the 2 tbsp freshly squeezed lemon juice—this prevents browning and adds brightness to the filling.
In a small bowl, whisk together the 1 tbsp cornstarch and 1 tbsp granulated sugar (from the extra amount noted in ingredients). Sprinkle this mixture over the fruit and gently stir until evenly coated. The cornstarch will help thicken the filling as it cooks, preventing a watery pie.
Transfer the fruit mixture to a medium saucepan and cook over medium heat for 8-10 minutes, stirring occasionally, until the fruit softens and the mixture thickens slightly. You're aiming for a consistency where the fruit releases its juices but still retains some texture. Remove from heat and stir in the 1 tsp vanilla extract—this adds depth to the tropical flavors.
🥘 Step 3: Assemble the Pie
Preheat your oven to 375°F. Roll out the chilled dough on a lightly floured surface to fit a 9-inch pie dish, leaving a ½-inch overhang all around. Gently transfer the dough to the pie dish and trim the edges, leaving the overhang for crimping later. Press the dough into the bottom and up the sides of the dish.
Pour the warm fruit filling into the prepared pie crust. The filling should come about ¾ of the way up the sides of the crust—don't overfill or it will spill over during baking. Brush the edges of the crust with cold water, then fold the overhang inward to create a decorative edge. Crimp the edges with a fork or your fingers to seal.
Cut a few small slits in the top crust to allow steam to escape. This prevents the pie from puffing up like a puff pastry. Place the pie on a baking sheet (to catch any drips) and bake for 40-45 minutes, until the crust is golden brown and the filling is bubbling gently. The center should still have a slight jiggle—it will continue cooking as it cools.
⏰ Step 4: Finish with Creamy Glaze
While the pie bakes, prepare the glaze by whisking together the 0.5 cup powdered sugar and 2 tbsp heavy cream in a small bowl until smooth. The glaze should be thin enough to drizzle but thick enough to coat the pie. If it's too thick, add 1 tsp lemon juice to loosen it.
As soon as the pie comes out of the oven, let it cool for 10 minutes—this allows the filling to set slightly. Then, using a spoon or pastry brush, drizzle the glaze evenly over the top and sides of the pie. The heat from the pie will make the glaze melt and create that beautiful glossy finish.
Let the pie cool completely on a wire rack before slicing. The filling will firm up as it cools, and the flavors will meld together beautifully. Serve warm or at room temperature with a scoop of vanilla ice cream for the ultimate tropical dessert experience.
Pro Tips For Making Apple Mango Pie
- Chill the Butter First: Cold butter makes flaky layers—no exceptions. Cut your unsalted butter into cubes and pop it in the fridge for 20 minutes before mixing with flour. I used to skip this and ended up with a dense, cakey crust instead of the tender, melt-in-your-mouth texture you want. Trust me, the pie filling will thank you later.
- Pre-Cook the Fruit: Sauté diced apples and mango with a pinch of cinnamon and 1 tablespoon of sugar for 5 minutes before baking. This softens the fruit, prevents a watery filling, and deepens the flavor. Skip this, and your pie will taste more like a soggy fruit salad than a spiced dessert.
- Don’t Overmix the Dough: Cut butter into flour with a pastry cutter or your fingers until it’s pea-sized, then stop. Overworking the dough develops gluten, and you’ll end up with a tough crust instead of the delicate, crumbly base you’re aiming for. Two minutes of mixing is all it takes—set a timer if you’re impatient like me.
- Use Room-Temp Eggs: Take eggs out of the fridge 30 minutes before using them. Room-temperature eggs blend more smoothly into the filling and create a richer, silkier texture. Cold eggs can make the filling grainy, and nobody wants to bite into a lumpy pie. (Yes, even if you’re in a hurry.)
Essential equipment for perfect results
Pie Dish Essentials
A 9-inch glass or ceramic pie dish is ideal for even heat distribution and easy release. I recommend Corelle stoneware for its durability and non-stick properties, or Wilton ceramic for classic performance. Avoid dark-colored dishes—they can cause the crust to brown too quickly. 🥧
Rolling Pin & Tools
Use a wooden rolling pin (like OXO Good Grips) for even pressure when rolling out the dough. A pie crust shield (or parchment paper) prevents sticking, while a pastry brush helps with egg wash and crimping edges. For precision, a bench scraper keeps dough edges clean. 🧑🍳
Mixing & Measuring
Accurate measurements start with a stainless steel kitchen scale (like OXO Good Grips) for flour and sugar. A pastry cutter (or two forks) ensures proper butter incorporation. For the filling, a sharp chef’s knife and mandoline (optional) help achieve uniform fruit dice. 🍎
Baking & Cooling
Bake on a rimmed baking sheet to catch drips and ensure even heat. A pie cooling rack prevents soggy bottoms. For glaze application, a small offset spatula or pastry brush works best. A digital thermometer (like Thermoworks Smoke) confirms doneness at 350°F internal temp. ✨
Optional Upgrades
For extra flakiness, try a pie weight (or dried beans) during blind baking. A pie server makes clean slices, while a dough scraper keeps worktops clean. For presentation, a dusting brush adds powdered sugar elegantly. 💫
Nutrition facts
Frequently asked questions
Can I make this pie without a pie dish?
Yes! If you don't have a traditional pie dish, use a 9-inch cast-iron skillet or a round cake pan with a removable bottom. Line the pan with parchment paper first to prevent sticking. For a rustic look, try a deep baking dish (like a Pyrex) with a pie crust shield on top to prevent puffing. Just reduce baking time by 5-7 minutes since metal conducts heat differently.
How do I prevent the crust from getting soggy?
Prevent soggy crusts by pre-baking the bottom crust for 10-12 minutes at 375°F before adding filling, or by sprinkling a thin layer of dried breadcrumbs or crushed cornflakes between crust and filling. Another trick: brush the bottom crust with egg white before adding the fruit mixture—it creates a barrier. Cool the pie completely before slicing too!
Can I substitute other tropical fruits?
Swap mangoes for pineapple, peaches, or papaya—just adjust cooking time (softer fruits need 5-7 minutes less). For extra richness, add ½ cup coconut milk to the filling. Keep the total fruit volume at 3 cups diced to maintain balance.
Why is my filling too watery?
Watery filling usually means undercooked cornstarch or overripe fruit. Simmer the filling 2-3 minutes longer> until it thickens, or add 1 tsp more cornstarch> mixed with 1 tbsp sugar and cook for 1-2 minutes. For extra insurance, chill the filling 10 minutes> before pouring into the crust—this helps it set faster.
How do I store leftovers?
Store at room temperature in an airtight container for 2 days> or refrigerate for 4-5 days>. For freezing, slice the pie first and freeze portions on a tray before transferring to a bag. Reheat slices in a 350°F oven for 8-10 minutes> or microwave for 20-30 seconds> to restore crispness. The crust stays best when kept dry!