
Desserts
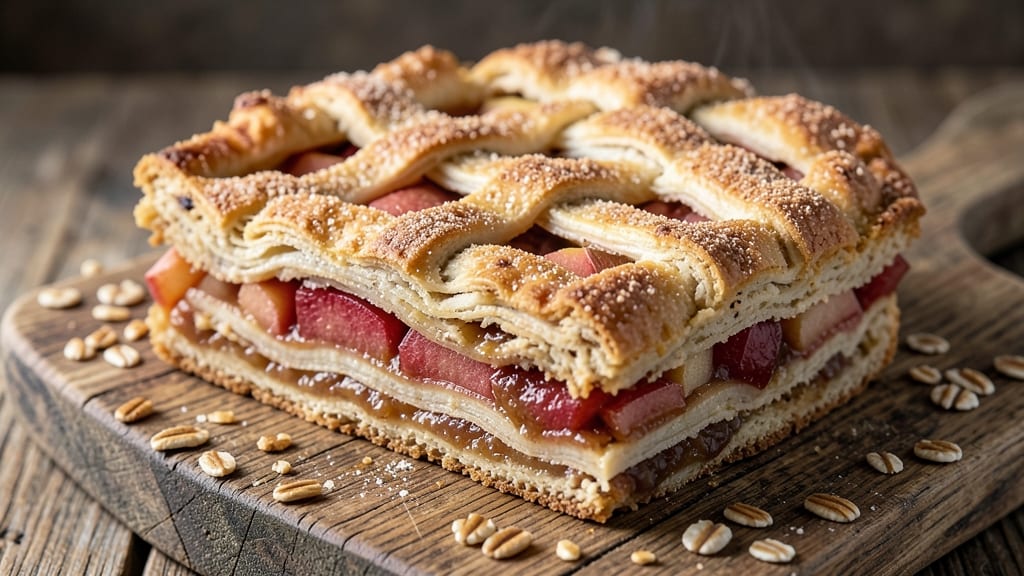
This poor man's apple pie recipe proves you don't need a fancy crust to create restaurant-quality comfort dessert—just a handful of affordable ingredients and a little patience. 💛 The secret lies in a spiced filling made with rolled oats, flour, and cinnamon that thickens beautifully while baking, creating a texture that's almost indistinguishable from traditional pie.
What makes this recipe special is its simplicity and cost-effectiveness—no store-bought crusts or expensive ingredients required. Instead, we use basic pantry staples like oats and flour to create a filling that's rich, spiced, and satisfying.
The result is a dessert that delivers all the warmth and nostalgia of classic apple pie without the complexity or expense.
By the time it emerges from the oven, you'll have a golden, bubbling pie with a tender, spiced filling that's perfectly balanced between sweet and cinnamon-spiced flavors. The aroma alone will have everyone gathering around the table, and the texture—soft yet slightly firm—makes it ideal for slicing and serving.
Serve it warm with a scoop of vanilla ice cream or a dollop of whipped cream for the ultimate budget-friendly dessert experience. This recipe is designed to be foolproof, so even beginners can achieve impressive results with minimal effort.
Ingredients for poor man's apple pie
Pantry staples transform into restaurant-quality dessert with just cinnamon, apples, and patience.
| Ingredient | Amount | Notes |
|---|---|---|
| Rolled Oats 🌾 | 1 ½ cups | Old-fashioned, not quick oats |
| All-Purpose Flour 🌾 | 1 ½ cups | White or whole wheat blend |
| Granulated Sugar 🍚 | 1 cup | White or light brown sugar |
| Ground Cinnamon 🌿 | 2 tbsp | Freshly ground preferred |
| Ground Nutmeg 🌿 | ½ tsp | Freshly grated for best flavor |
| Salt 🧂 | ½ tsp | Diamond Crystal preferred |
| Unsalted Butter 🧈 | ½ cup | Cold, cubed for texture |
| Apples 🍎 | 4 medium | Mixed variety, peeled and sliced |
| Lemon Juice 🍋 | 1 tbsp | Freshly squeezed, for brightness |
| Vanilla Extract 🍯 | 1 tsp | Pure vanilla preferred |
| Heavy Cream 🥛 | ½ cup | Cold for best texture |
| Granulated Sugar 🍚 | 2 tbsp | For topping, optional |
The oats and flour create a filling with pie-like texture without requiring a crust. Bob's Red Mill rolled oats are ideal—they're finely ground and absorb moisture beautifully. For flour, a 50/50 blend of all-purpose and whole wheat adds subtle nuttiness. Apples should be a mix of tart and sweet varieties—Granny Smith and Honeycrisp work perfectly. If you can't find those, any firm, flavorful apple will do. The cinnamon is non-negotiable here; Penzeys Spice Shop sells excellent ground cinnamon, but the grocery store stuff works fine. Just make sure it's fresh—if it smells like dust, toss it.
No vanilla extract? Vanilla bean paste works equally well, or even a pinch of vanilla sugar in a pinch. Substituting apples? Pears or peaches work beautifully, but adjust cooking time as they soften differently. The butter should be cold when mixed in—this creates pockets of richness that mimic traditional pie crust. For a dairy-free version, coconut oil works well, though the texture will be slightly different. The heavy cream topping is optional but adds a luxurious finish that makes this feel like a special dessert. If you skip it, a sprinkle of coconut flakes adds crunch without dairy.
This filling keeps well in the fridge for 4-5 days, though it's best served fresh. For make-ahead convenience, prepare the filling up to 24 hours ahead and refrigerate. When ready to bake, simply transfer to a baking dish and proceed. The baked pie reheats beautifully—just 10 minutes at 350°F restores its warmth. Portion into individual servings before freezing for up to 3 months. The texture remains intact, making this an excellent make-ahead dessert for gatherings.
Why You'll Love This Recipe
- No-Fuss Crust: I swear by this oat-flour shortcut—no rolling, no fuss. Just mix, press, bake. That crispy edge with the tender center? It’s the real deal, and honestly? I’ve never missed pie dough.
- Spiced Warmth: The cinnamon and nutmeg hit like a cozy hug. Rolled oats add a chewy texture that’s not too sweet, not too dry—just right. It’s the kind of flavor that makes you want to lick the pan.
- Lunchbox Hero: Between us, this is my go-to for school lunches or office snacks. Cut into squares, pack in a container, and it stays fresh for days. My kid still asks for it after three days in her lunchbox—no joke.
- Pantry Magic: I make this with whatever’s in my cupboard. No fancy apples? Use canned or frozen. No egg for binding? A splash of milk works. It’s the ultimate budget win that never feels like a compromise.
Step-by-step instructions for no-crust apple pie
Simple, hearty, and completely foolproof—this method delivers pie-like satisfaction without the fuss.
👨🍳 Step 1: Prepare the Filling Base
In a large mixing bowl, combine the 1.5 cups rolled oats and 1.5 cups all-purpose flour. Whisk together until no lumps remain—this ensures an even texture in your filling. The oats will give your pie that satisfying rustic bite, while the flour helps bind everything beautifully.
In a separate small bowl, mix the 1 cup granulated sugar, 2 tbsp ground cinnamon, 0.5 tsp ground nutmeg, and 0.5 tsp salt. Sift this spice mixture over the oat-flour blend and whisk again until fully incorporated. This dry rub is the soul of your pie—don't skip the nutmeg, even though it's just 0.5 tsp. It adds that warm, cozy depth that makes this pie feel like home.
🍳 Step 2: Cook the Apples Until Tender
Peel, core, and slice the 4 medium apples into ¼-inch thick slices. Toss them immediately with the 1 tbsp lemon juice to prevent browning—this keeps them bright and fresh-tasting. In a large skillet over medium heat, melt the 0.5 cup unsalted butter until it foams but doesn't brown.
Add the apple slices in a single layer, letting them cook undisturbed for 3-4 minutes until they begin to soften and release their juices. Stir gently, then add the dry spice mixture from Step 1. Cook for another 5-6 minutes, stirring occasionally, until the apples are tender but still hold their shape. You're aiming for a jammy consistency—not mushy, but not quite dry either. This is where the magic happens: the spices meld with the apples' natural sweetness.
🥘 Step 3: Assemble and Bake the Pie
Preheat your oven to 375°F. Transfer the cooked apple mixture to a 9-inch pie dish (or a deep oven-safe skillet if you're improvising). Spread it evenly, pressing down gently with a spatula to compact the filling. This step ensures even baking and prevents a runny center.
In a small bowl, whisk together the 0.5 cup heavy cream and 1 tsp vanilla extract. Pour this creamy mixture evenly over the apple filling. The cream adds richness and helps create that classic pie crust texture—without needing actual crust. Sprinkle the 2 tbsp granulated sugar on top if you're using it for extra caramelization. Bake for 35-40 minutes until the top is golden brown and the filling bubbles gently at the edges.
⏰ Step 4: Rest and Serve for Maximum Comfort
Remove the pie from the oven and let it rest for 10 minutes before serving. This resting period allows the filling to set slightly and the juices to redistribute—critical for that perfect slice. The edges should be set but still slightly soft, with a caramelized top that glistens like a real pie crust.
Serve warm with a scoop of vanilla ice cream or a dollop of whipped cream. The contrast of cold and warm makes every bite feel like a hug. Store leftovers in the refrigerator for up to 3 days, though I doubt they'll last that long. This pie is designed to disappear quickly—comfort food at its finest.
Pro Tips For Making Poor Man'S Apple Pie
- TOAST THE OATS FIRST: Skip the raw oat texture—lightly toast them in a dry pan over medium heat for 3-4 minutes until golden and nutty. This cuts the grainy bite and deepens the flavor, making the whole pie taste more like a proper crust. (Yes, even if you’re impatient like me.)
- MIX DRY INGREDIENTS WELL: Don’t just eyeball the flour and sugar—whisk them together with the cinnamon and nutmeg before adding liquid. This prevents clumps and ensures every bite has that warm spice punch. I learned this the hard way when my first batch had uneven pockets of dryness.
- PRESS THE CRUST HARD: Use the bottom of a glass to firmly press the oat-flour mixture into the pan, packing it tight. A loose crust won’t hold its shape and turns soggy faster. Think of it like tamping coffee grounds—firm pressure = better structure.
- BAKE UNTIL GOLDEN, NOT JUST SET: Don’t pull it out when it looks "done"—keep it in until the edges are deep golden brown (about 10-15 minutes past the recipe’s suggested time). This caramelizes the sugars, giving that classic pie crust flavor without needing butter. (Your future self will thank you.)
Essential equipment for perfect results
Essential Tools
You don’t need fancy equipment—just a few kitchen basics. A 9-inch pie dish (or deep oven-safe skillet) is your best bet for even baking. If you don’t have one, a ceramic baking dish works too.
A large mixing bowl for combining dry ingredients and a medium skillet for cooking apples are must-haves. No special tools here—just what you likely already own! 🍎
Apples Matter
Choose sharp knives for peeling and slicing apples evenly—thin, consistent slices cook faster. A mandoline speeds things up if you’re prepping a big batch, but a chef’s knife works just fine.
Toss apples with lemon juice immediately to prevent browning while you prep. A microplane comes in handy for fresh nutmeg if you’re using it.
Mixing & Measuring
Use a whisk to combine oats and flour for a lump-free base. A measuring cup set ensures accuracy—don’t eyeball flour or oats, as packing can alter texture.
For spices, a spice grinder keeps cinnamon and nutmeg fresh, but pre-ground works too. A small bowl for mixing dry spices keeps your workspace tidy.
Baking Essentials
An oven thermometer is worth the investment—ovens vary wildly, and 375°F is critical here. A spatula helps spread filling evenly in the dish. For the creamy topping, a small whisk blends heavy cream and vanilla smoothly. A cooling rack lets the pie set properly after baking, preventing soggy bottoms.
Optional Upgrades
Want to elevate this further? A pastry brush adds a light egg wash for extra browning. Caramel drizzle? Use a small saucepan to melt sugar and butter. For serving, a pie server makes clean slices, but a sharp knife works too.
The beauty of this recipe? You can skip all upgrades and still get a delicious result.
Nutrition facts
Frequently asked questions
Can I use this recipe without apples?
While apples are traditional, you can swap them for peaches, pears, or even berries like blueberries or raspberries. For stone fruits, reduce baking time by 5-10 minutes since they soften faster. Berries work best if you simmer them first to release juices—just add 1 tbsp cornstarch to thicken the filling before baking.
Why does my filling look too dry?
This usually happens if you overcook the apples or skip the heavy cream topping. The cream adds moisture and richness—never omit it! If your filling seems dry during baking, try adding 2 tbsp apple juice or water to the cooked apples before assembling. For extra insurance, place a small bowl of water in the oven while baking to add humidity.
How do I make this gluten-free?
Replace the all-purpose flour with a 1:1 gluten-free baking flour blend like Bob's Red Mill, and use certified gluten-free oats. The texture will be slightly different but still delicious. For extra binding, add 1 tbsp ground flaxseed mixed with 3 tbsp water to the dry ingredients. Note that gluten-free versions may need 5-10 extra minutes of baking time.
Can I bake this in a different-sized dish?
Yes! For an 8-inch dish, reduce all ingredients by about 20% to maintain thickness. In a 10-inch dish, increase by 30% and bake for 40-45 minutes. Always adjust baking time based on your oven—look for golden brown edges and bubbling filling. A 9-inch dish gives the best texture, but any oven-safe container works in a pinch.
What's the secret to extra crispy edges?
For crispier edges, sprinkle 1 tbsp granulated sugar around the perimeter before baking, then broil for 2-3 minutes at the end. You can also preheat the pie dish in the oven for 5 minutes before adding the filling. For even more crunch, top with crushed graham crackers or oatmeal cookies before baking.