
Desserts
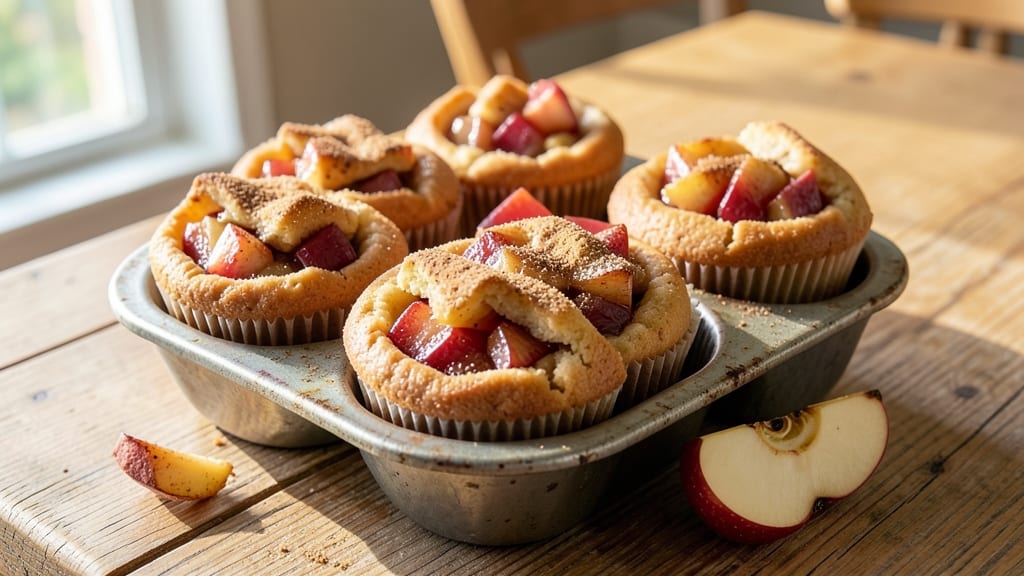
This apple pie cookie cups recipe delivers all the comfort of classic pie in bite-sized, crunchy-topped perfection. 🌟 The secret lies in a buttery shortbread crust that encases spiced apple filling, baked until golden and tender—like a miniature apple pie you can eat in one bite.
I developed this recipe after years of perfecting pie crusts and fillings, and it’s become a holiday favorite that disappears faster than you can say "warm spice."
The magic starts with a simple shortbread dough that forms the base and top of each cup, creating that signature crunchy texture.
The filling combines tart apples with warm cinnamon, nutmeg, and a touch of brown sugar for depth, while a sprinkle of coarse sugar on top caramelizes into a crispy lattice during baking.
What makes these different from traditional pie is the individual serving size—no need for a pie dish or serving utensils, just grab-and-go dessert magic.
By the time they emerge from the oven, these cookie cups will have a golden, crackly top that contrasts with the soft, spiced apple filling inside. The aroma alone—warm apples, cinnamon, and buttery crust—will fill your kitchen, making it feel like a cozy autumn afternoon.
They’re perfect for holiday gatherings, potlucks, or even a special treat to enjoy with your morning coffee.
Best of all, this recipe scales easily—double the batch for parties, or keep it small for a personal indulgence. The technique is straightforward, but the results feel like a bakery secret. Let’s get baking!
Ingredients for apple pie cookie cups
Buttery crust, spiced apples, and crunchy sugar topping—everything you need for these bite-sized apple pie treats.
| Ingredient | Amount | Notes |
|---|---|---|
| All-Purpose Flour 🌾 | 2 ½ cups | Sifted for light texture |
| Unsalted Butter 🧈 | 1 cup | Cold, cubed for dough |
| Granulated Sugar 🍚 | ½ cup | For dough sweetness |
| Tart Green Apples 🍎 | 2 medium | Peeled, finely diced (Granny Smith) |
| Light Brown Sugar 🍚 | ⅓ cup | Packed for filling |
| Ground Cinnamon 🌿 | 2 tsp | Freshly ground preferred |
| Ground Nutmeg 🌿 | ¼ tsp | Freshly grated |
| Vanilla Extract 🥛 | 1 tsp | Pure vanilla preferred |
| Coarse Turbinado Sugar 🍚 | ¼ cup | For crunchy topping |
| Large Eggs 🥚 | 1 whole | Room temperature |
| Salt 🧂 | ½ tsp | Fine sea salt |
| Lemon Juice 🍋 | 1 tbsp | Freshly squeezed |
The apples are non-negotiable—Granny Smiths have that perfect tartness. Local farmers markets usually have them in season, but any tart green apple works. I always peel and dice mine by hand (food processor makes it too mushy), and a quick toss with lemon juice keeps them from browning while you prep. The butter? European-style if you can find it—more flavor, less water. For the dough, don't overwork it—just mix until it comes together. The secret to those perfect little cups is using a 24-cup mini muffin pan (I got mine at Williams Sonoma), but any mini muffin pan works in a pinch.
No Granny Smiths? Honeycrisp or Fuji will work in a pinch. The brown sugar can be swapped for white if you're watching carbs, but I won't lie—it makes the filling richer. Running short on vanilla? Almond extract at half the amount gives a nice twist. The turbinado sugar is worth hunting down for that caramelized crunch, but regular sugar works fine if you're in a hurry. For the dough, if you've got almond flour on hand, swap out 1/4 cup of the all-purpose for a nutty flavor boost. And if you're making these ahead, freeze the unbaked cups—they'll keep for up to 2 months.
These keep beautifully—3 days at room temperature in an airtight container, 1 week refrigerated, or 3 months frozen. I always make a double batch because they disappear fast. For freezing, bake them first, then store in a single layer before transferring to a bag. Reheat in the oven at 350°F for 5-10 minutes to restore that fresh-baked crunch. The filling actually tastes better the next day once everything melds together. Trust me, the leftovers are just as good as the first batch.
Why You'll Love This Recipe
- No-Fuss Baking: I swear by this recipe when I forget to pull out pie crust. Just mix, press into a muffin tin, and bake—no rolling, no fuss. The edges get that perfect golden crunch while the center stays soft, like a hug in cookie form.
- Tart-Sweet Magic: That balance of brown sugar caramelizing with tart green apples? Chef’s kiss. The butter melts into the dough just enough to make every bite taste like autumn in a cup. Honestly, I’ve never met a cookie that hits this flavor combo so well.
- Party in a Tin: These disappear at gatherings—no one can resist the warm, gooey centers. I’ve served them at book clubs, holiday potlucks, and even as a "dessert" for my grumpy teen after soccer practice. (Yes, even on a Tuesday night.)
- Make-Ahead Genius: Bake a batch on Sunday, store them in the fridge for up to a week, and reheat for 10 seconds. They’re my secret weapon for lazy mornings or when I forget to pack snacks. Plus, they freeze like a dream—just toss them in the toaster oven later.
Step-by-step instructions for apple pie cookie cups
Here's how to make these warm, spiced bites with crispy tops and gooey centers.
👨🍳 Step 1: Mix the Cookie Dough
In a large mixing bowl, combine the 2.5 cups all-purpose flour, 0.5 tsp salt, 2 tsp ground cinnamon, and 0.25 tsp ground nutmeg. Whisk until evenly distributed—those spices will make all the difference in flavor. In a separate bowl, beat the 1 cup cold unsalted butter and 0.5 cup granulated sugar together until light and fluffy, about 2-3 minutes.
Add the 1 whole large egg and 1 tsp vanilla extract, mixing until fully incorporated. Gradually pour the dry ingredients into the wet mixture, stirring just until combined. The dough should hold together when pressed but still look slightly crumbly. Don't overmix—this keeps the texture tender. Wrap the dough in plastic wrap and chill for at least 1 hour (or up to 24 hours) in the refrigerator.
🍳 Step 2: Prepare the Apple Filling
While the dough chills, peel and finely dice the 2 medium tart green apples (about 2 cups diced). Toss them with 0.33 cup light brown sugar, 1 tbsp freshly squeezed lemon juice, and a pinch of salt. Let the mixture sit for 10 minutes—this helps draw out moisture and intensify the apple flavor. The filling should look juicy but not soupy.
In a small bowl, whisk together 0.33 cup light brown sugar with 1 tsp vanilla extract and 1 tbsp lemon juice. Fold this into the apple mixture, giving it a final taste. The filling should be sweet but balanced with tartness—this prevents the cookies from becoming too cloying. Cover and refrigerate until ready to use.
🥘 Step 3: Assemble the Cookie Cups
Preheat your oven to 350°F and line a baking sheet with parchment paper. Take the chilled dough and roll it out to about ¼-inch thickness on a floured surface. Use a 2-inch round cookie cutter to cut out circles—you should get about 24 cookies. Press each circle into the bottom of a greased mini muffin tin or mini pie pan.
Spoon about 1 teaspoon of the apple filling into each dough circle, pressing down gently to create a well. The filling should be centered and slightly mounded. Sprinkle each cookie cup with a pinch of the 0.25 cup coarse turbinado sugar for that signature crunchy topping. Bake for 12-15 minutes until the edges are golden brown and the tops look set.
🔥 Step 4: Finish and Serve Warm
Remove the cookie cups from the oven and let them cool in the pan for 2-3 minutes. They should still be warm and slightly gooey in the center—this is where the magic happens. Serve immediately while the filling is still soft and the topping is crisp. If you need to store them, let them cool completely, then transfer to an airtight container. Reheat in a 350°F oven for 5-7 minutes to restore that warm, comforting texture.
Here's the thing—these cookie cups taste even better the second time around. The filling firms up slightly as it cools, but the contrast of warm, spiced apple with that crispy sugar topping makes every bite irresistible. Perfect for potlucks, holiday gatherings, or just a cozy dessert when you crave something homemade.
Pro Tips For Making Apple Pie Cookie Cups
- CHILL THE APPLE FILLING: I learned this the hard way—packing warm apple filling into the cups makes the butter in the dough melt too fast, leading to soggy bottoms. Let that filling sit in the fridge for at least 20 minutes before spooning it in. Cold filling = crispy shells.
- CUT BUTTER IN SMALL BITS: I used to cube the butter like I do for pie crust, but it doesn’t behave the same way here. Grate or cut it into tiny pea-sized pieces—this ensures even distribution and prevents pockets of uncooked dough. (Yes, it looks like a science experiment, but it works.)
- PRESS FIRM, NOT HARD: Pressing the dough into the muffin tin is where most people go wrong—either too light (edges won’t brown) or too hard (they’ll crack). Press until the dough is flush with the tin, but don’t force it. A gentle, even pressure is all you need.
- USE A LIGHT TOUCH WITH SUGAR: The recipe calls for brown sugar in the filling, but I’ve found that adding just a teaspoon of granulated sugar to the dough makes the edges actually golden. The brown sugar in the filling is enough—don’t double up unless you want a caramelized mess. (Trust me, your taste buds will notice.)
Essential equipment for great apple pie cookie cups
Mini Muffin Tin
The heart of these cookie cups is a 24-cup mini muffin pan—it creates the perfect bite-sized shape while ensuring even baking. I recommend a non-stick pan like the Nordic Ware Half Sheet Pan (which often comes with mini muffin cups) or a Wilton 24-Cup Mini Muffin Pan for durability.
If you don’t have one, any standard mini muffin tin will work, just grease it well with butter or baking spray to prevent sticking. 🧁
Cookie Cutters
For the dough base, you’ll need a 2-inch round cookie cutter to create uniform circles. I use a Weston Pro Stainless Steel Cookie Cutter because it’s precise and easy to clean, but any 2-inch cutter will do.
If you’re short on time, you can also use a glass or shot glass to press the dough into the muffin tin—just make sure it’s the same size for consistent results.
Rolling Pin
A lightweight rolling pin (like the OXO Good Grips or Kitchenaid Silicone Rolling Pin) makes rolling out the dough much easier. The dough is delicate, so avoid heavy pins that can flatten it too much.
If you’re in a pinch, a wine bottle or large glass works in a bind—just roll the dough between two sheets of parchment paper for easier handling. 🍪
Mixing Bowls
Use a medium and large mixing bowl—one for the dry ingredients and one for the wet. I prefer stainless steel bowls (like the Pyrex Glass Mixing Bowls) because they’re sturdy and easy to clean, but any non-reactive bowl (glass or ceramic) will work.
Avoid plastic if you’re mixing butter and flour, as it can absorb odors over time.
Measuring Tools
Precision matters here! Invest in a set of measuring cups and spoons (I love the OXO Good Grips or Farberware Stainless Steel sets) for accurate measurements. For the turbinado sugar topping, a small spoon or measuring spoon ensures even distribution.
A microplane comes in handy for freshly grating nutmeg, but a fine grater works too. 🌶️
Baking Sheet
Line a standard baking sheet with parchment paper for easy cleanup when transferring hot cookie cups. I keep a roll of parchment paper (like Reynolds Parchment Paper) on hand for quick access.
If you’re baking multiple batches, preheat the oven and use a cooling rack to prevent soggy bottoms while they set.
Nutrition facts
Frequently asked questions
Can I make these without a cookie cutter?
Use a 2-inch round glass or shot glass to press dough into the muffin tin. For a rustic look, you can also use a thimble or even a spoon to shape the dough—just make sure each piece is roughly the same size for even baking. The key is consistency in the base size so the filling doesn't overflow.
Why did my cookie cups turn out flat instead of domed?
This usually happens when the dough is too warm or overworked. Chill the dough for the full 1 hour (or overnight) to firm it up, and avoid overmixing—just combine until it holds together. For extra height, press the dough slightly thicker in the center before adding filling, and use a 24-cup mini muffin pan (standard pans are shallower).
Can I use a different type of apple?
Tart apples like Granny Smith or Honeycrisp work best, but you can try Braeburn or Fuji in a pinch. Avoid overly sweet apples like Gala or Red Delicious—they'll make the filling too cloying. For extra flavor, add ½ tsp apple pie spice (cinnamon + nutmeg + allspice) to the filling.
How do I store these for maximum freshness?
Let them cool completely, then store in an airtight container at room temperature for 3 days, or refrigerate for 1 week. For longer storage, freeze baked cups (without topping) for up to 3 months. To reheat, bake at 350°F for 5-7 minutes—this restores the crispy top and melts the filling just right.
Can I make these gluten-free?
Yes! Swap the all-purpose flour for a 1:1 gluten-free baking flour blend (like Bob's Red Mill) and add ½ tsp xanthan gum if your blend doesn't include it. Use 1 tbsp almond milk extra in the dough to compensate for reduced gluten structure. The texture will be slightly denser but still delicious.