
Desserts
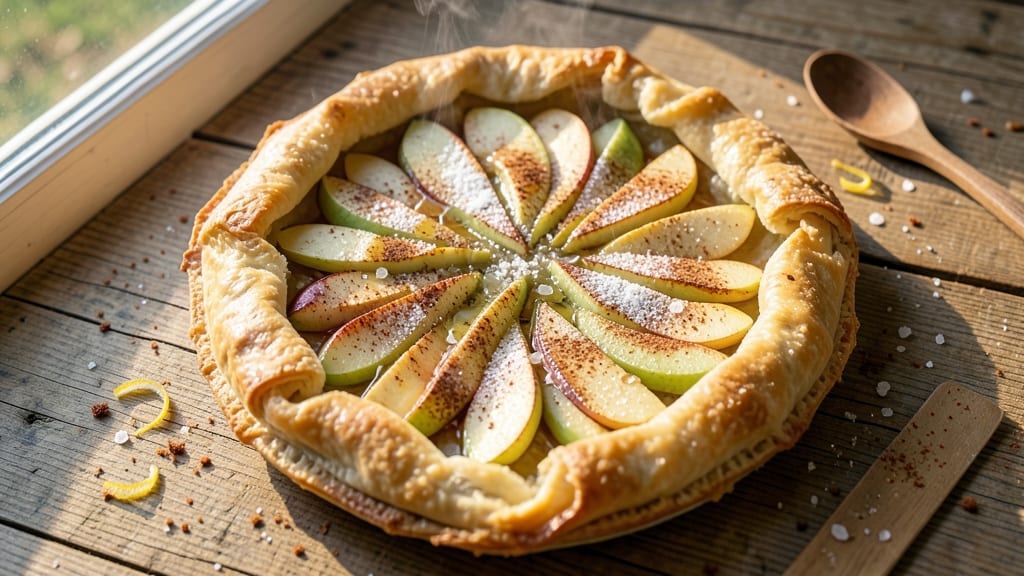
This apple galette recipe with Pillsbury pie crust proves you don’t need French pastry skills to create a showstopping dessert. The secret lies in its effortless assembly—no rolling required—just a rustic crust, tender apples, and a touch of cinnamon that transforms simple ingredients into something magical.
With just 30 minutes of prep and 45 minutes in the oven, you’ll have a golden, flaky galette that looks like it came from a Parisian bakery.
The beauty of this recipe is its simplicity: Pillsbury pie crust handles all the fussy work for you, while a few slices of apple, sugar, and spices create the filling. The crust’s edges naturally ruffle during baking, giving it that authentic galette charm without requiring advanced techniques.
This dessert is perfect for busy weeknights or weekend brunches—it’s foolproof, impressive, and best of all, minimal mess.
What you’ll end up with is a warm, buttery galette with a crispy crust and juicy, caramelized apples peeking through. The aroma alone will have everyone gathering around the table, and the first bite delivers that perfect balance of sweet, spiced apples and flaky pastry.
It’s the kind of dessert that feels special without being complicated.
Optional finishing touches like a drizzle of honey or a dusting of powdered sugar elevate it further, but even without them, this galette is undeniably delicious.
Whether you’re serving it with vanilla ice cream or a dollop of whipped cream, this recipe is your shortcut to restaurant-quality results—with none of the stress. Let’s get baking!
Ingredients for apple galette recipe with pillsbury pie crust
Pillsbury crust and just 11 ingredients transform into a golden, rustic galette—no French skills required.
| Ingredient | Amount | Notes |
|---|---|---|
| Pillsbury Classic Pie Crust (1 sheet) 🥧 | 1 sheet | Thawed if frozen, no rolling needed |
| Granny Smith Apples 🍎 | 4 medium | Peeled, sliced into 1/4-inch pieces |
| Granulated Sugar 🍚 | ¾ cup | Light brown sugar for caramelized flavor |
| Ground Cinnamon 🌿 | 2 tsp | Freshly ground preferred |
| Lemon Juice 🍋 | 2 tsp | Freshly squeezed |
| Salt 🧂 | ½ tsp | Fine sea salt preferred |
| Unsalted Butter 🧈 | 2 tbsp | Melted, for brushing crust |
| Vanilla Extract 🌸 | ½ tsp | Pure vanilla for aroma |
| Powdered Sugar 🍚 | 2 tbsp | Optional for dusting |
| Honey 🍯 | 2 tbsp | Optional drizzle |
| Heavy Cream 🥛 | ¼ cup | Optional for serving |
The apples are everything here. Granny Smiths stay firm when baked, but Honeycrisp or Fuji work too. Look for apples that are firm but not rock-hard—Trader Joe's or Whole Foods usually have great quality. Pillsbury crust is a game-changer—no need to fuss with rolling dough. Just unfold it, fill, and fold. The secret to that perfect galette ruffle? Don't overwork the crust when folding. Let it relax for 10 minutes before baking, or it'll fight back.
No Granny Smiths? Any crisp apple works—just adjust sweetness with extra sugar if needed. The cinnamon is non-negotiable for that classic galette flavor, but add a pinch of nutmeg if you're feeling fancy. Pillsbury crust has salt, but I still add a touch of sea salt to the filling for balance. The butter brushing? Don't skip it—that's what makes the crust golden and crispy. For extra flakiness, brush with melted butter before AND after folding. And if you're feeling indulgent, swap regular sugar for maple sugar—trust me, it's worth it.
This galette reheats beautifully—just pop it in a 350°F oven for 10 minutes to crisp up the crust. Store leftovers wrapped at room temp for 2 days or freeze the whole galette (unbaked or baked) for 3 months. The filling keeps well, but the crust gets soggy if you're not careful. I always bake one extra—it disappears fast. Serve with vanilla ice cream or whipped cream for that classic dessert finish.
Why You'll Love This Recipe
- No-Fuss Assembly: I swear by this recipe because it’s the kind of dessert where you don’t need to be a pastry chef. Roll out that Pillsbury crust, toss in sliced Granny Smiths with a sprinkle of sugar and cinnamon, fold the edges—done. The crust does all the heavy lifting, and honestly, it’s foolproof even if your galette looks more "rustic" than "bakery-perfect."
- Tart-Sweet Magic: That bright Granny Smith tang with just a touch of lemon juice? It’s the secret weapon. The sugar caramelizes into little pockets of sweetness while the cinnamon warms it up—like a hug for your taste buds. (Yes, even on a Tuesday night.)
- Weekend or Weeknight: Bring it to a potluck or eat it straight from the pan after work. The same simple steps work whether you’re feeding a crowd or just craving something warm. I’ve made it for brunch, dessert, or even a lazy Sunday morning—no judgment.
- Leftovers? Even Better: The crust stays crispy for days, and the apples soften just right. Wrap slices in parchment, freeze them, and reheat for a grab-and-go breakfast or snack. (Between us, I’ve eaten cold galette straight from the fridge—no shame.)
Step-by-step instructions for apple galette recipe with Pillsbury pie crust
Here's how to create this rustic French masterpiece with minimal effort and maximum flavor.
Prepare the Apple Filling
In a large bowl, combine the 4 medium Granny Smith Apples that you've already peeled and sliced into ¼-inch pieces. Add the 0.75 cup Granulated Sugar, 2 tsp Ground Cinnamon, 2 tsp Lemon Juice, and 0.5 tsp Salt. Toss everything together until the apples are evenly coated and the sugar begins to caramelize slightly.
Let the mixture sit for 5 minutes while you prepare the crust. This resting time allows the apples to soften just enough and releases their juices, which will create a beautifully fragrant filling. The lemon juice brightens the tart apples while the cinnamon adds warmth—don't skip this step if you want that authentic galette flavor.
Assemble the Galette on the Crust
Unfold the 1 sheet Pillsbury Classic Pie Crust on a parchment-lined baking sheet. Gently brush the entire surface with the 2 tbsp melted Unsalted Butter, leaving about 1 inch uncovered around the edges. This butter will create a golden, flaky crust that's the hallmark of a perfect galette.
Sprinkle the 0.5 tsp Vanilla Extract over the buttered crust, then carefully pile the apple mixture in the center. Don't try to spread it out—this is what gives the galette its rustic, uneven look. Leave space around the edges so you can easily fold the crust over later. The apples should look like a tempting little mountain in the middle of your crust.
Fold and Crimp the Crust
Here's where the magic happens: gently lift the edges of the crust and fold them over the apple filling, creating a loose, rustic bundle. Try to keep the filling contained but don't stress about perfect edges—this is supposed to look homemade! Once folded, use your fingers to crimp the edges together, sealing in all that delicious filling.
Brush any exposed crust with a little more melted butter if needed. This step is all about creating that beautiful, irregular shape that makes galettes so special. The filling will bubble out slightly during baking, so don't worry if it looks a bit messy now—it'll be perfect when it emerges from the oven.
Bake to Golden Perfection
Preheat your oven to 375°F. Bake the galette for 40-45 minutes until the crust is deep golden brown and the filling is bubbling. You'll know it's done when the crust looks crisp and the apples are tender enough to pierce easily with a fork.
During the last 5 minutes of baking, watch closely for browning. If the crust starts to get too dark, loosely cover it with aluminum foil. The galette should smell absolutely divine when it comes out of the oven—like warm cinnamon apples with buttery crust. Let it cool for 10 minutes before serving to allow the filling to set slightly.
Serve with Optional Extras
Once cooled, dust the warm galette with the 2 tbsp Powdered Sugar for a beautiful finish. Drizzle with the 2 tbsp Honey and serve warm with the 0.25 cup Heavy Cream on the side. The contrast of the creamy, cool cream with the warm, spiced apple filling is pure perfection.
Slice into wedges and serve immediately—this galette is best enjoyed fresh from the oven. If you have any leftovers (unlikely!), store them at room temperature for up to 2 days or refrigerate for up to 4 days. The flavor only gets better as it sits, with the apples absorbing all that delicious crust flavor.
Pro Tips For Making Apple Galette Recipe With Pillsbury Pie Crust
- Preheat Pan First: The pie crust hates cold metal—roll it out on parchment, then slide it directly into a preheated 375°F oven for 10–12 minutes before adding apples. This gets the edges set fast and prevents soggy bottoms later. (Yes, even if the recipe says otherwise.)
- Slice Apples Thin: Skip the thick chunks—cut Granny Smiths into ¼-inch slices (yes, measure it) so they soften evenly without turning to mush. Toss them with lemon juice immediately after slicing to stop browning, then sprinkle with cinnamon and sugar while they’re still damp. Wet ingredients stick better to the crust.
- Don’t Overstuff: Pillsbury crust can handle it, but packing apples too tightly makes them steam instead of caramelize. Arrange slices in a loose, slightly overlapping spiral, leaving a 1-inch border around the edges. The crust needs room to puff, not fight for space.
- Brush Edges Now: After the initial 10-minute blind bake, brush the crust’s inner rim with cold water while the oven’s still hot. This helps the folded-over edge stick to itself without needing extra dough. (And no, egg wash isn’t necessary—it’ll just burn.)
Common mistakes when making perfect results
Overfilling the Crust
The biggest mistake is packing too much apple filling into the crust. When you overfill, the edges won't properly seal during baking, causing the filling to spill out and create a messy, soggy bottom.
I've learned to leave at least 1 inch of empty space around the edges before folding. This ensures the crust can properly encase the filling while still creating that beautiful rustic shape. 🥧
Skipping the Butter Brush
Many people forget to brush the crust with melted butter before baking, which is what gives galettes their signature golden color and crispy texture. I always brush the entire surface with 2 tbsp melted unsalted butter, including the edges.
This step is non-negotiable for achieving that perfect bakery-style crust. Don't be tempted to skip it—your galette will thank you!
Not Resting the Filling
After tossing the apples with sugar and spices, it's crucial to let the filling rest for 5 minutes before assembling. This allows the apples to release their juices and soften slightly, which prevents a watery filling in your galette.
I've made this mistake and ended up with a soggy bottom—trust me, the resting time makes all the difference. 🍎
Overworking the Crust
When folding the edges of the crust, resist the urge to press too hard or overwork the dough. The Pillsbury crust is delicate, and excessive handling can make it tough instead of flaky.
Gently fold and crimp the edges, then let the crust relax for 10 minutes before baking. This resting period helps the crust maintain its structure and creates those beautiful, irregular ruffles.
Baking at Wrong Temperature
Using the wrong oven temperature is a common downfall. This galette needs to bake at 375°F for optimal results. Too low, and the crust won't brown properly; too high, and the filling may cook too quickly, leaving the crust undercooked.
I always preheat my oven thoroughly and use the middle rack for even heat distribution. A good rule of thumb is to check for doneness after 40 minutes—the crust should be golden brown and the apples tender.
Ignoring the Cooling Time
Fresh from the oven, a galette looks irresistible, but serving it immediately can cause the filling to leak out and the crust to become too soft. Always let your galette cool for at least 10 minutes before slicing.
This allows the filling to set slightly and the crust to firm up, making it easier to serve without a mess. Patience here ensures every bite is perfect, not a runny disaster. ✨
Nutrition facts
Frequently asked questions
Can I use a different type of apple for this galette?
While Granny Smiths are ideal for their tartness and firmness, you can use Honeycrisp, Fuji, or even Braeburn apples. Just be aware that sweeter apples like Honeycrisp may need slightly less sugar (try 0.6 cup instead of 0.75 cup). The key is choosing apples that hold their shape when baked but aren't too hard.
How do I prevent the crust from getting soggy?
The secret is proper preparation! Brush the crust with melted butter before AND after folding, and avoid overfilling. Leave at least 1 inch of empty space around the edges. Also, let the galette cool for 10 minutes before slicing—this allows the filling to set and the crust to firm up.
Can I make this galette ahead of time?
Yes! Assemble the galette up to 24 hours ahead and refrigerate (unbaked). When ready to bake, let it sit at room temperature for 30 minutes before baking as directed. For leftovers, store at room temperature for 2 days or refrigerate for 4 days. The flavor actually improves as it sits!
What if I don't have vanilla extract?
No problem! You can skip it entirely—the recipe will still taste delicious. For extra flavor, try ½ tsp almond extract or even a pinch of ground cardamom. The cinnamon is the star here, so don't stress about the vanilla. The buttery crust and caramelized apples will shine on their own.
How do I make this galette gluten-free?
Swap the Pillsbury crust for a gluten-free pie crust alternative (like Bob's Red Mill or store-bought gluten-free pie shells). Use the same assembly method, but be extra gentle when folding to avoid cracking. The baking time may need adjustment—check for doneness at 35-40 minutes since gluten-free crusts often brown faster.