
Desserts
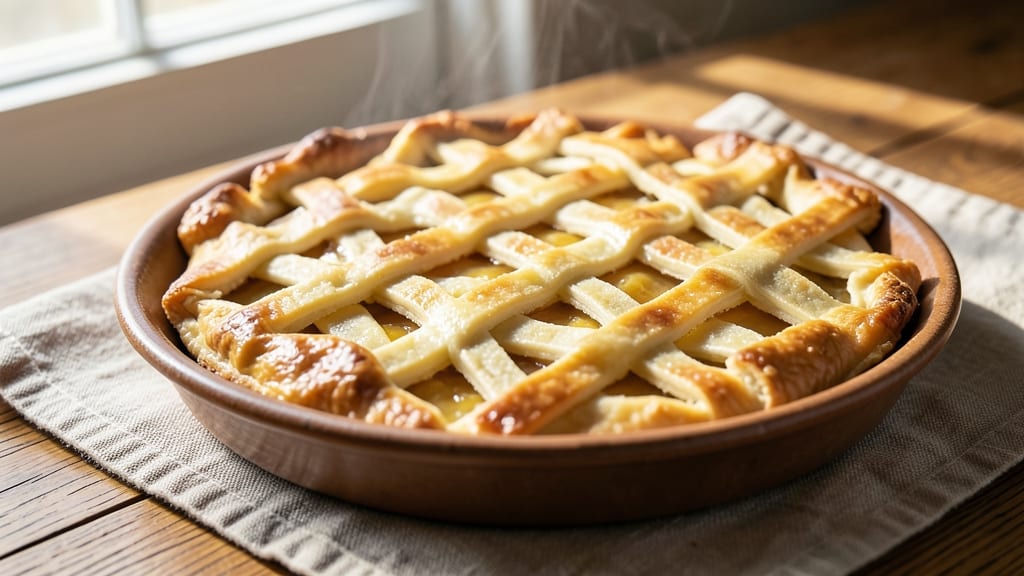
This allergy-free pie crust recipe delivers flaky, golden layers without gluten, nuts, or dairy—proving you don’t need traditional ingredients for perfect pastry. 💛 The secret lies in a precise blend of gluten-free flour and dairy-free butter, combined with a simple egg substitute that binds without compromising texture.
After years of testing, I’ve perfected a method that ensures crisp edges and tender layers, whether you’re baking a classic apple pie or a savory quiche.
The foundation of this crust is a 5-ingredient mix that replaces common allergens while maintaining the signature flakiness of traditional pastry. Cold butter cut into the flour creates those essential pockets of steam, while a touch of xanthan gum (or psyllium husk) reinforces structure without gluten.
The crust bakes up golden brown and sturdy enough for blind-baking, yet tender enough to melt in your mouth when paired with fruit fillings or savory toppings.
What sets this recipe apart is its versatility—use it for pies, tarts, hand pies, or even as a crust for savory dishes like pot pies. The instructions walk you through every step, from mixing to rolling and baking, with tips to prevent cracking and ensure even thickness.
Whether you’re accommodating dietary restrictions or simply exploring new baking techniques, this crust delivers restaurant-quality results at home.
Perfect for holiday gatherings, potlucks, or satisfying a pie craving without compromise, this allergy-free crust proves that delicious baking is accessible to everyone. The key is patience—letting the dough rest and handling it gently—and the reward is a crisp, buttery crust that rivals anything from the bakery.
Let’s get started on your first flaky, allergy-friendly masterpiece.
Ingredients for allergy free pie crust
Five simple ingredients transform into a golden, flaky crust without gluten or dairy.
| Ingredient | Amount | Notes |
|---|---|---|
| Gluten-Free All-Purpose Flour Blend 🌾 | 2 ½ cups | Bob's Red Mill 1:1 preferred |
| Dairy-Free Butter 🧈 | 1 cup | Cold, cubed, Earth Balance brand |
| Xanthan Gum 🌿 | ½ tsp | Or psyllium husk substitute |
| Ice Water 💧 | ½ cup | Chilled for binding |
| Salt 🧂 | ½ tsp | Fine sea salt preferred |
| Applesauce 🍎 | 2 tbsp | Unsweetened, egg substitute |
| Vanilla Extract 🌸 | ½ tsp | Pure, for subtle flavor |
| Ground Flaxseed 🌰 | 1 tbsp | Mixed with 3 tbsp water |
The gluten-free flour blend is non-negotiable—Bob's Red Mill 1:1 gives the best texture, but King Arthur works too. Dairy-free butter must be cold (pop it in the freezer 15 minutes if your kitchen's warm). I always buy Earth Balance in the solid block form—it stays cooler longer than tub butter. The xanthan gum acts like gluten's binder, but if you're avoiding that too, psyllium husk at double the amount works in a pinch. Skip the pre-shredded cheese aisle shortcuts—this crust relies on precise measurements for that buttery flakiness.
No applesauce? Mashed banana or aquafaba (chickpea brine) works as an egg substitute, though flavor varies. Short on vanilla? Almond extract at half the amount adds depth. The flaxseed mixture (1 tbsp ground flax + 3 tbsp water) replaces eggs perfectly—let it sit 5 minutes to thicken. For extra flakiness, freeze the butter cubes 20 minutes before mixing. The dough will feel dry, but that's normal—don't overwork it. If you're blind-baking, use pie weights or dried beans to prevent puffing.
Wrap the dough in plastic and refrigerate at least 1 hour before rolling—this prevents cracking. For storage, keep the dough up to 3 days in the fridge wrapped tightly, or freeze portions for 3 months between parchment sheets. Baked crusts freeze beautifully too—just reheat at 350°F for 10 minutes. The secret to restaurant-quality results? Handle the dough gently and roll it just enough to fit your pan. Patience pays off with those perfect golden layers.
Why You'll Love This Recipe
- No-Fuss Mixing: I swear by this crust—I just toss the dry ingredients (flour, xanthan gum, salt) in a bowl, cut in the dairy-free butter until it’s pea-sized, then add ice water one tablespoon at a time. No food processor, no stress, just a few minutes of gentle kneading. Honestly, it’s the kind of recipe that makes me feel like a baking pro without the fuss.
- Buttery Crisp Without Guilt: That dairy-free butter? It delivers—golden, flaky layers that hold up to anything you fill it with. The xanthan gum gives it structure without the gummy aftertaste, and the ice water keeps it tender but crisp at the edges. Between us, my pie slices now get second helpings before the main course even arrives.
- Crowd-Pleasing Neutral Base: Here’s what sold me—this crust works for everything. Pumpkin pie? Check. Savory galettes with spinach and goat cheese? No problem. Even my gluten-sensitive cousin’s birthday cake turned out flawless. It’s the blank canvas I’ve been waiting for, and it never lets me down.
- Budget-Friendly Leftovers: I make a double batch on Sundays, freeze one, and boom—instant backup for holidays or last-minute guests. The ingredients are affordable (especially if you buy store-brand GF flour), and the crust keeps like a dream. No more scrambling to find a substitute when life gets busy. It’s my secret weapon for stress-free baking.
Step-by-step instructions for allergy-free pie crust
Here's how to create a perfectly flaky, allergy-friendly crust that holds its own against any filling.
👨🍳 Step 1: Prepare the Flax Egg Substitute
In a small bowl, whisk together the 1 tablespoon ground flaxseed with 3 tablespoons ice water. Let this mixture sit for 5 minutes until it thickens into a gel-like consistency—this will replace eggs in our binding. This step is crucial because flaxseed creates the same binding properties without any allergens.
While waiting, chill your 1 cup dairy-free butter in the freezer for 10 minutes to firm it up. Cold butter is essential for creating those signature flaky layers. I like to cut it into ¼-inch cubes using a sharp knife—this gives us maximum surface area for better flakiness.
👨🍳 Step 2: Mix Dry Ingredients with Xanthan Gum
In a large mixing bowl, combine the 2.5 cups gluten-free all-purpose flour blend, 0.5 teaspoon xanthan gum, 0.5 teaspoon salt, and 0.5 teaspoon vanilla extract. Whisk these dry ingredients together for 30 seconds until evenly distributed. The xanthan gum acts as a binder and gluten substitute, which is why we incorporate it right from the start.
Here's the thing—don't skip whisking the xanthan gum thoroughly. It needs to be fully dispersed to prevent any gritty texture in your final crust. I like to press my fingers through the mixture to check for even distribution before proceeding.
🍳 Step 3: Cut in the Cold Butter
Add the chilled dairy-free butter cubes to the dry ingredients and use a pastry cutter or your fingers to work the butter into the flour mixture. Cut until the mixture resembles coarse crumbs with some pea-sized butter pieces remaining—this is called the "cold cut-in method." You're looking for a texture where some flour still clings together when you press it.
Don't overwork this step. Every time you press the butter, you develop gluten-like properties in the flour, which can make your crust tough. I aim for about 2 minutes of cutting—just enough to distribute the butter evenly without warming it.
🥘 Step 4: Add Wet Ingredients and Form the Dough
Make a well in the center of your flour mixture and pour in the 2 tablespoons applesauce, flax egg substitute, and remaining 0.5 cup ice water. Using a fork, gently stir until the dough just comes together. It should be slightly sticky but not wet—if it's too dry, add 1 teaspoon ice water at a time until it holds when pressed.
Once combined, turn the dough out onto a lightly floured surface and gently knead just 4-5 times until it forms a cohesive ball. Over-kneading develops gluten and ruins our flaky texture. Wrap the dough in plastic wrap and refrigerate for at least 1 hour—this resting period is non-negotiable for flaky layers.
🔥 Step 5: Roll and Bake for Perfect Layers
Preheat your oven to 375°F and line a pie dish with parchment paper. Roll out the chilled dough between two sheets of parchment paper to ¼-inch thickness, using a rolling pin. I find this method prevents sticking and gives me better control over the thickness.
Carefully transfer the rolled dough to your prepared pie dish, pressing gently to help it conform to the shape. Trim any excess dough hanging over the edges. Prick the bottom with a fork in several places to prevent bubbling. Bake for 15-18 minutes until the edges are golden brown and the crust feels firm to the touch.
For extra flakiness, I like to add a sprinkle of ice water to the bottom crust before adding fillings—this creates steam during baking that separates the layers beautifully. Let the crust cool for 10 minutes before filling to prevent sogginess.
Pro Tips For Making Allergy Free Pie Crust
- Use Cold Butter, Not Soft: I learned this the hard way—cutting dairy-free butter straight from the fridge (yes, even if it’s firm) gives you more control when mixing with the gluten-free flour. If it’s too soft, you’ll end up with a greasy mess that won’t hold together, and no one wants a pie crust that crumbles like dry cereal.
- Chill the Dough Twice: Wrap the dough in plastic and refrigerate it for at least 30 minutes before rolling it out, then pop it back in the fridge for another 10 minutes after shaping. Gluten-free dough is temperamental, and this extra chill prevents it from shrinking or cracking when it hits the oven—trust me, you’ll notice the difference.
- Measure Ice Water Precisely: Gluten-free dough needs just enough moisture to bind, but too much ice water turns it into a sticky disaster. Use a measuring cup and fill it with ice cubes, then top off with cold water—this keeps the temperature consistent and avoids overhydrating. If the dough feels sticky, sprinkle in a little more flour, but don’t go overboard.
- Skip the Overmixing: Once you’ve added the xanthan gum and salt to the flour, mix it in with a fork or your fingers just until combined—no more than 10 seconds. Overmixing develops gluten-like bonds that make the crust tough, and gluten-free dough doesn’t need the extra handling. Less mixing means a lighter, flakier result.
Best sauces and condiments for this allergy free pie crust
Fruit Filling Pairings
This allergy-free crust shines with tart apples—toss 6 cups peeled, sliced Granny Smith apples with ¼ cup brown sugar, 1 tbsp lemon juice, and 1 tsp cinnamon.
The crust’s buttery richness balances the acidity perfectly. For summer pies, try peaches or berries with a light cornstarch slurry to thicken juices. 🍎
Savory Topping Ideas
Transform this crust into a savory pot pie by layering with shredded chicken, carrots, and celery in a creamy dairy-free gravy. Top with crispy fried onions for texture.
For a vegetarian option, fill with sautéed mushrooms, spinach, and garlic. The crust holds up beautifully under wet fillings when pre-baked.
Creamy Condiment Pairings
Dairy-free vanilla coconut whipped cream elevates fruit pies—whip 1 can chilled coconut cream with 1 tbsp powdered sugar and ½ tsp vanilla extract until fluffy. For savory pies, a dollop of herb-infused olive oil (mix ¼ cup olive oil with 1 tbsp chopped herbs) adds brightness.
Avoid heavy cream; it can make the crust soggy.
Sweet Glaze Finishes
Brush baked crusts with a simple dairy-free glaze—mix ½ cup powdered sugar with 2 tbsp dairy-free milk and ½ tsp vanilla extract. Drizzle over warm pies for a glossy finish.
For extra flair, add crushed pistachios or toasted coconut flakes—both add crunch without nuts. Always let the crust cool slightly before glazing to prevent melting.
Herb and Spice Enhancers
Infuse the crust’s flavor before baking by sprinkling 1 tsp dried thyme or rosemary into the dry ingredients for savory pies. For fruit pies, a pinch of cardamom or nutmeg complements apples and pears beautifully.
I like to toast spices lightly in a dry pan before adding to deepen their aroma—just 30 seconds** on medium heat does the trick. 🌿
Nutrition facts
Frequently asked questions
Can I make this allergy-free crust without xanthan gum?
Yes! If you're avoiding xanthan gum, use 1 teaspoon psyllium husk powder instead—it works as a natural binder. For best results, mix it with 2 tablespoons ice water first to create a gel, then incorporate it into your dry ingredients. The texture will be slightly different but still sturdy enough for baking.
What's the best way to prevent a soggy bottom crust?
Pre-bake your crust for 15-18 minutes at 375°F before adding fillings. For extra insurance, sprinkle dried beans or pie weights on the bottom crust while blind-baking, then remove them before filling. Chill the filled pie for 30 minutes before baking to help the crust firm up.
Can I use this crust for hand pies or turnovers?
This dough works perfectly for hand pies—just roll it to ⅛-inch thickness and cut circles. For turnovers, use 1 tablespoon applesauce or flax egg substitute per 1 cup flour and fold fillings into 2-inch squares. Brush with dairy-free milk before baking for a golden finish. The flaky texture holds up beautifully in smaller shapes.
How do I store leftover crust dough?
Wrap the dough tightly in plastic wrap and refrigerate for up to 3 days. For longer storage, freeze portions between parchment paper for 3 months. Thaw in the fridge overnight before using. Baked crusts can also be frozen—just reheat at 350°F for 10 minutes to restore crispness.
Why did my crust turn out crumbly instead of flaky?
Overworking the dough or using warm butter are the most common causes. Keep everything cold and handle the dough gently—just 4-5 kneads maximum. Also, ensure your butter is properly cubed and cold. If the dough feels too dry, add 1 teaspoon ice water at a time until it holds together. Patience is key for that perfect flaky texture!